Send your agent's alerts to your own app
A step-by-step guide with pictures, from the Speakvora agent's own Connect tab.
Short answer: GOAL: when something happens in your agent (a customer asks for a person, an order is ready), it also posts a small message to a web address of your own, so your own software, Zapier, Make or n8n can react. TIME: 10 minutes. COST: free. YOU NEED: an https web address that accepts messages, from your developer.
Every key, number and name in the pictures is a made-up example. Nothing here asks you to share a real key with anyone but the app on your own computer.
GOAL: when something happens in your agent (a customer asks for a person, an order is ready), it also posts a small message to a web address of your own, so your own software, Zapier, Make or n8n can react. TIME: 10 minutes. COST: free. YOU NEED: an https web address that accepts messages, from your developer, Zapier, Make or n8n.
Part 1. Open the Connect tab in your agent
- Open your agent's dashboard (the page you open from the Start Speakvora Agent file).
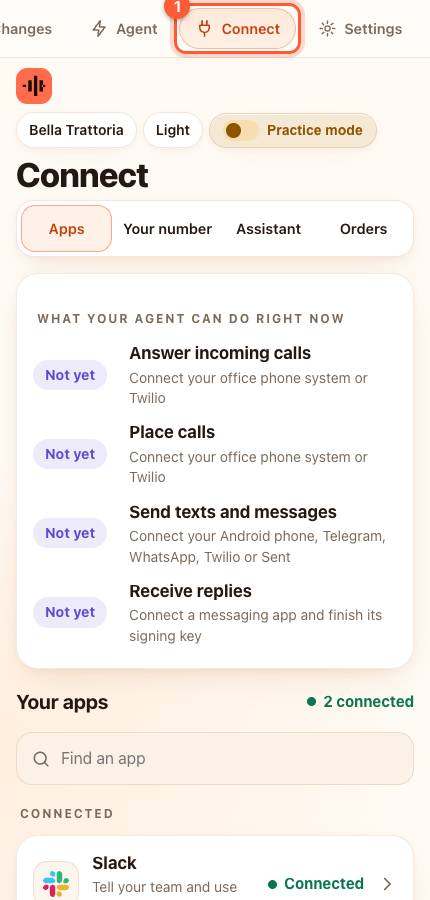
- Press Connect in the menu. On a phone the menu is the bar along the top; slide it sideways if you do not see Connect.
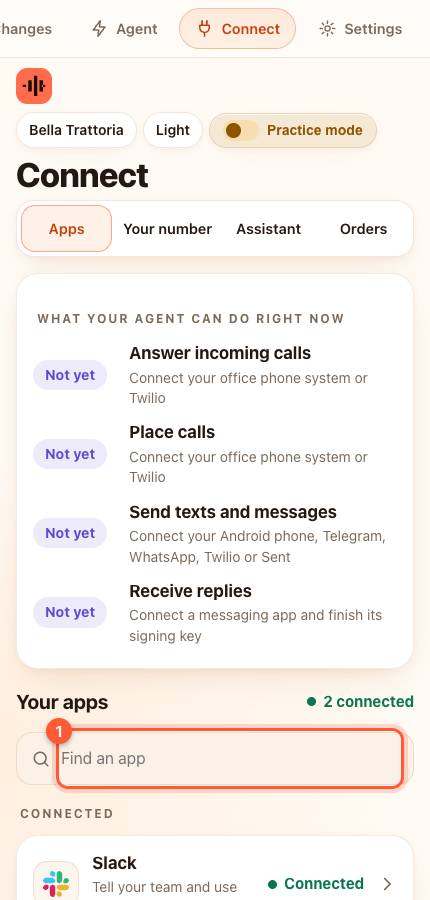
- Under Your apps type my apps in the box that says Find an app (1), or scroll down to Add an app and press Send to my own app. A window slides up.
Part 2. Fill in the window called My apps
- Name: any name, for example *My order system*.
- Web address: the https address your app gave you (for example https://my-app.example.com/speakvora).
- How does your app check who is calling? choose No key needed, An API key in a header, A bearer token or User and password (user:password), as your app says.
- If you chose a header, type the Header name (for example X-Api-Key). If you chose anything except No key needed, paste the Key or token. It stays on this computer and is never shown again.
- Press the orange Save connection.
YOU SHOULD SEE: the word Saved, and the connection listed under My apps in Connect.
Part 3. Test it
- Open the connection in the list and press its test button. The agent posts
{"test": true}to your address.
YOU SHOULD SEE: green words saying your app answered, and the test message arriving in your app.
Part 4. Use it
- Open Your agent, then Explore ready-made automations, and add a step that sends to your app. Pick the connection you made.
If something is wrong
- It says the address must start with https://: only localhost addresses may use http.
- Red words with a number (401 or 403): your app refused the key. Paste it again, and check you chose the right way your app checks it.
- No message arrives in your app: read your app's own log. The agent writes the answer it got in Activity.
All help guides · Every agent feature · AI receptionist by industry
Questions
What if this happens: It says the address must start with https://?
only localhost addresses may use http.
What if this happens: Red words with a number (401 or 403)?
your app refused the key. Paste it again, and check you chose the right way your app checks it.
What if this happens: No message arrives in your app?
read your app's own log. The agent writes the answer it got in Activity.