Let your own app, Zapier or Make send events to your agent
A step-by-step guide with pictures, from the Speakvora agent's own Connect tab.
Short answer: GOAL: when something happens in another program (an order is placed, a form is filled, a payment fails), it tells your agent, and your agent texts, calls or alerts your team. TIME: 10 minutes. COST: free. YOU NEED: your agent running with a public address (see Permanent address), and a program that can send a web.
Every key, number and name in the pictures is a made-up example. Nothing here asks you to share a real key with anyone but the app on your own computer.
GOAL: when something happens in another program (an order is placed, a form is filled, a payment fails), it tells your agent, and your agent texts, calls or alerts your team. TIME: 10 minutes. COST: free. YOU NEED: your agent running with a public address (see Permanent address), and a program that can send a web request (any app with "webhooks", Zapier, Make, or a developer).
NOTE: If you have never used webhooks, use Zapier or Make: they do this with buttons and no code. Ask whoever built your website or app if you are unsure.
Part 1. Open the Connect tab in your agent
- Open your agent's dashboard (the page you open from the Start Speakvora Agent file).
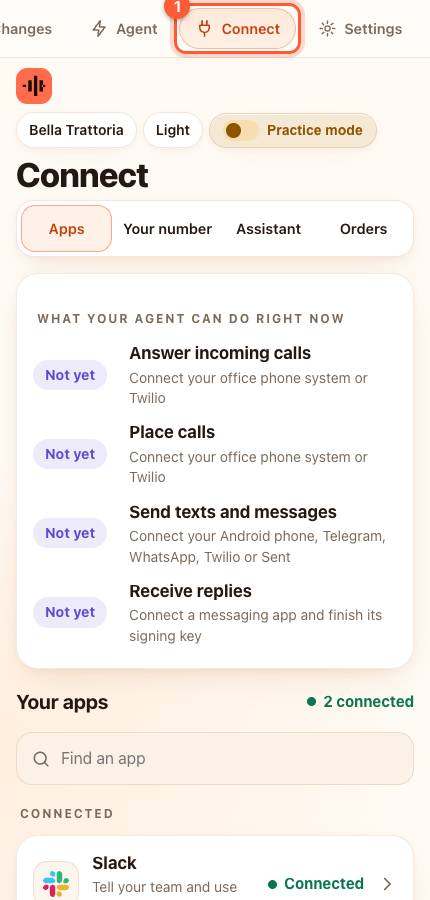
- Press Connect in the menu. On a phone the menu is the bar along the top; slide it sideways if you do not see Connect.
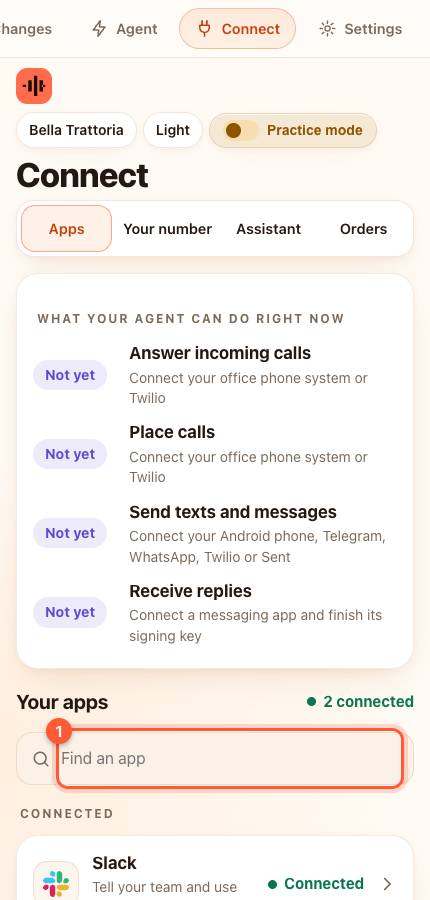
- Under Your apps type events in the box that says Find an app (1), or scroll down to Add an app and press Let my app send events here. A window slides up.
Part 2. Create your private address
- Under What is sending events? type a name, for example *Shopify store* or *Zapier*.
- Leave Your website... empty unless visitors' browsers send errors straight here.
- Press the orange Create address.
YOU SHOULD SEE: two boxes appear: Your private address (it ends in /event) and Your token, plus a ready-made test command (curl).
TIP: To copy: click inside the box and press Command + C on a Mac or Ctrl + C on Windows. Keep the token private: anyone with it can start your workflows.
Part 3. Give them to the other program
- In Zapier or Make choose Webhooks, POST. Paste the private address into URL.
- Add a header named Authorization with the value Bearer then a space then your token.
- Send a JSON body whose event says what happened, for example
{"event":"order.ready","id":"1","customer":{"name":"Ann","phone":"+15551234567","sms_consent":true}}. The window lists the event names your workflows understand. - Use a different id for each event so the agent counts each only once.
Part 4. Test it
- Send one event, or run the curl command shown in the window in a Terminal.
YOU SHOULD SEE: the event listed in Activity within a few seconds. In practice mode nothing is sent to customers; Activity only shows what would happen.
If something is wrong
- Activity says the token was refused (401): the Authorization header is missing or the token is wrong. Copy it again.
- Nothing arrives: the address must be reachable from the internet and start with https. A time-out means the public address is wrong.
- The same event twice: send a different id with each real event and the same id for a retry.
All help guides · Every agent feature · AI receptionist by industry
Questions
What if this happens: Activity says the token was refused (401)?
the Authorization header is missing or the token is wrong. Copy it again.
What if this happens: Nothing arrives?
the address must be reachable from the internet and start with https. A time-out means the public address is wrong.
What if this happens: The same event twice?
send a different id with each real event and the same id for a retry.