Your agent: phone menu, automations, bookings and testing
A step-by-step guide with pictures, from the Speakvora agent's own Connect tab.
Short answer: Everything your agent does by itself lives in one place: the Your agent tab. Here you build your phone menu ("press 1 for hours, 2 to book, 3 for billing, 4 for shipping, 0 for a person"), make your own "when this happens, do this" automations, and test all of it by pretending to be a customer. Time: about 15.
Every key, number and name in the pictures is a made-up example. Nothing here asks you to share a real key with anyone but the app on your own computer.
Everything your agent does by itself lives in one place: the Your agent tab. Here you build your phone menu ("press 1 for hours, 2 to book, 3 for billing, 4 for shipping, 0 for a person"), make your own "when this happens, do this" automations, and test all of it by pretending to be a customer. Time: about 15 minutes. Cost: nothing extra.
Before you start
- The agent is running and you can see the dashboard. Everything below happens in practice mode: nothing is sent, nobody is called.
- Settings, Your business details has your business name, opening hours and your on-call phone (the person key 0 connects to). Key 0 cannot connect anyone until that number is set.
- For a menu that customers can also *speak* to, connect your Speakvora key (Connect, Speakvora agent). Without it, callers use the keypad only.
Step 1. Open the Your agent tab
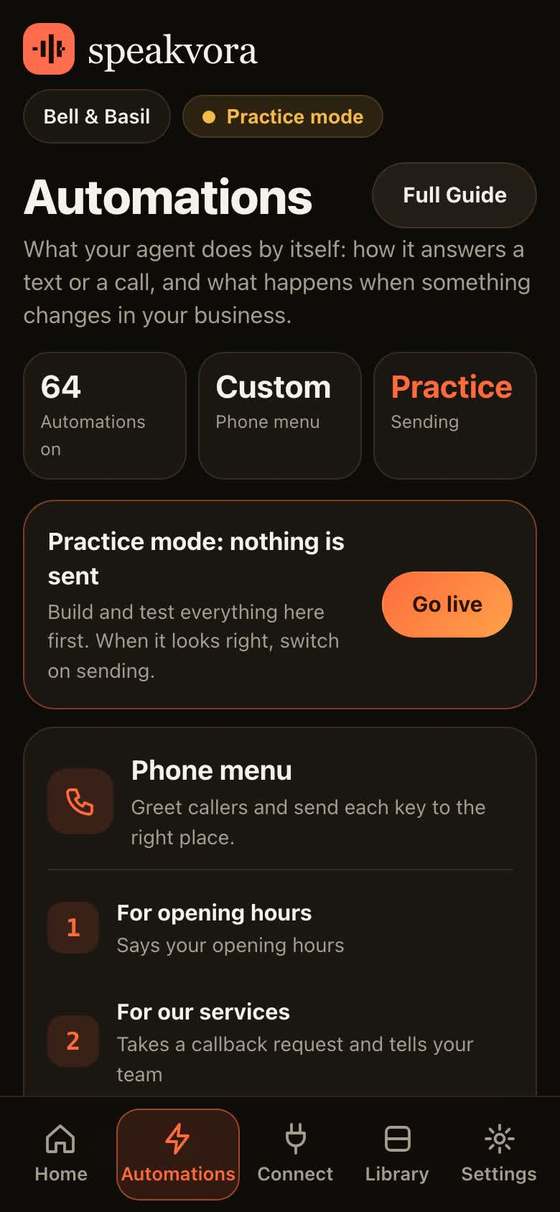
- Press Your agent in the bar (on a phone it is the second icon at the bottom, next to Connect).
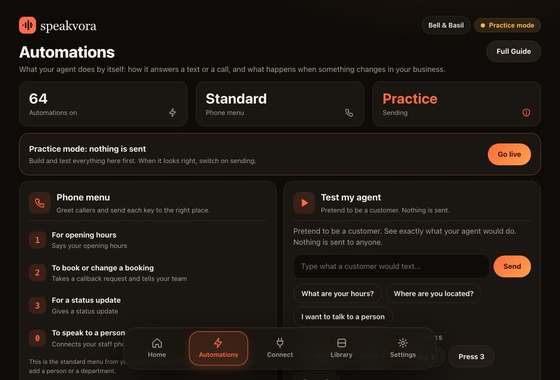
- The three tiles at the top show how many automations are on, whether your phone menu is the standard one or your own, and whether sending is practice or live.
- Below them: Phone menu and Test my agent side by side, then Your automations and Saved choices.
Step 2. Test what you have first
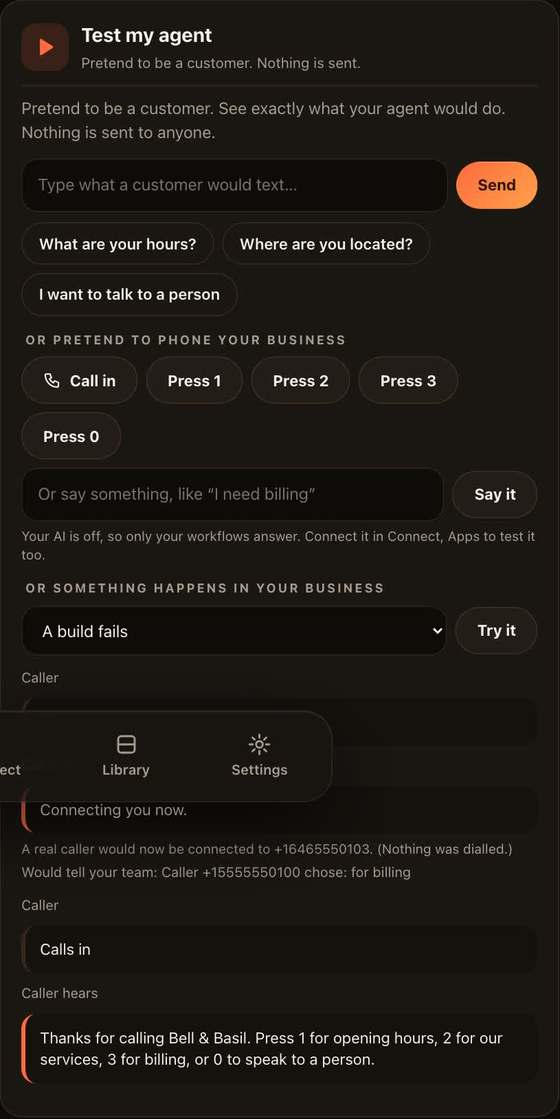
- In Test my agent, type what a customer would text, for example "What are your hours?", and press Send. You see exactly what your agent would reply and why.
- Under "Or pretend to phone your business", press Call in. You see what a caller hears. Then press a key (Press 1, Press 3) or type what a caller might say and press Say it.
- Nothing is sent or dialled. A transfer shows "A real caller would now be connected to ..." and nothing more.
Step 3. Build your phone menu
- In the Phone menu card press Build my own phone menu.
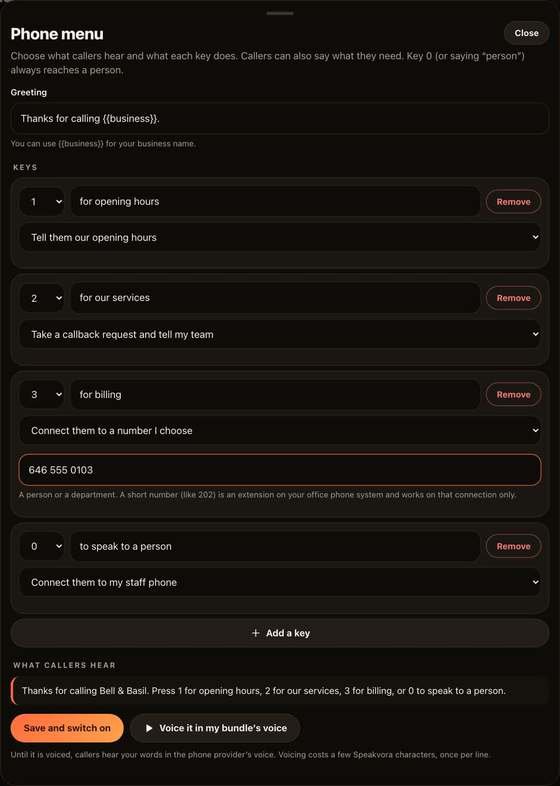
- Greeting: what callers hear first. You can write {{business}} and it becomes your business name.
- Keys: each row is one key.
- The first box is the key (0 to 9).
- The text box finishes the sentence "Press 3 ...", for example
for opening hours,to book,for billing. - The last box is what the key does: tell your opening hours, say a message you write, take a callback request (your team is told), connect your staff phone, or connect a number you choose.
- For a person or a department, choose Connect them to a number I choose and type the full phone number, with area code. It can be a person's mobile or a hunt group at your phone company.
- Press Add a key for more options (any of the keys 0 to 9, ten in all). Press Remove to take one away.
- Check What callers hear at the bottom of the same screen (in the picture above). It is the exact sentence, with your business name filled in.
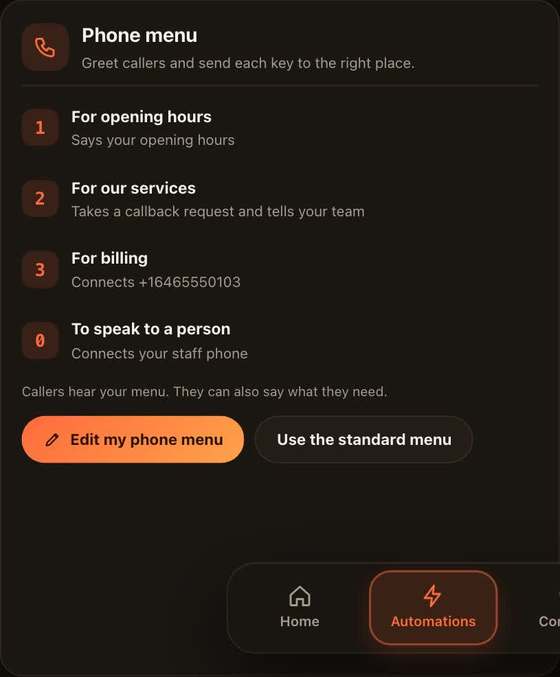
- Press Save and switch on. The card now shows your keys and the tile says Custom.
Rules that keep callers safe:
- Key 0 always reaches a person. If you leave 0 out, the agent adds "0 to speak to a person". You cannot use 0 for anything else. Callers who say "person", "human" or "manager" are connected to a person too.
- Two misses in a row connect a person, so nobody is stuck in the menu.
- Do not put card numbers or passwords in the menu. The agent refuses them.
Step 4. Voice it (optional)
Until you do this, callers hear your words in your phone provider's voice (or the computer's voice on an office phone connection). Press Voice it in my agent's voice at the bottom of the editor to have Speakvora speak the greeting in your agent's voice. It needs your Speakvora key and costs a few characters, once per line.
Step 5. Test the new menu
- Back in Test my agent, press Call in: you hear your new greeting.
- Press each key and read what happens. Press 3 shows the number it would connect.
- Type "I need billing" in the say box: spoken names from your menu work too.
Step 6. Make your own automation
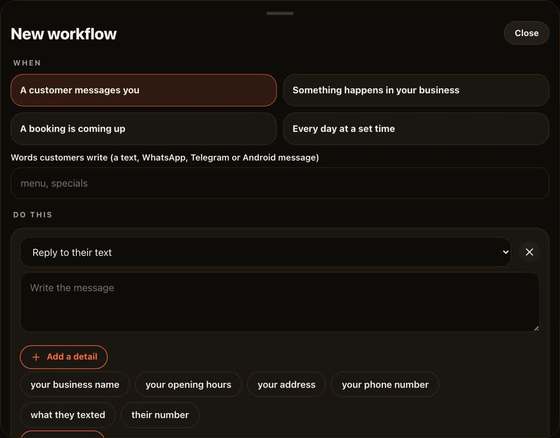
- In Your automations press New workflow.
- Choose When this happens (a customer messages you a word by text, WhatsApp or Telegram, something happens in your business, a booking is coming up, or a time of day), then Do this (reply, text the customer, tell your team on Slack or Teams, or email someone).
- Type your message. You can use details such as {{business}} or {{customer.name}}; the box tells you which ones fit.
- Press Save. It is switched on. Use the switch in the list to turn it off later.
- The ready-made automations for your industry are under Explore the ready-made automations. The list shows ten at a time; scroll inside it for more, and use Needs your OK, On and Off to filter. Each name says plainly what it does, for example "Reminds customers before their booking".
- Press one to open it. Read what it says, change the wording or when it runs, and press Approve and turn on. Until you approve it, nothing is sent. A yellow "Needs" line says which app to connect first (Connect tab).
- Reminds customers before their booking lets you tick how long before: two days, the day before, the morning of, or four, two or one hour before. The agent picks the line that fits each time.
- Answers texts when you are closed needs your opening days and times (in the same window). Until you set them it stays quiet.
- Shops, restaurants, salons, laundries and car businesses also see Announce a sale: it watches the pages you list, writes a draft, and sends it only after you approve it, only to people who agreed to sale texts. It never appears for health, pharmacy, legal, finance, public-service or school businesses.
Step 7. Go live
- When everything above looks right, press Go live (on the Your agent tab, or Settings).
- The agent checks that your business details, a connected service and your automations have what they need. Fix anything it lists, then switch on sending.
- Practice mode stays one switch away: Settings, Go live, Back to practice mode.
On a phone
The same tab works on a phone: the tiles shrink, the cards stack, and the editor opens as a sheet from the bottom.
Good to know
- Your phone menu works the same on every way callers can reach the agent: Twilio numbers and an existing office phone system.
- On an office phone system callers can speak their choice when the agent has your Speakvora key; the agent hears them until they pause, turns the words into text with Speakvora's speech-to-text (about $0.0015 a minute, audio not kept), and then does what the matching key does.
- Speaking is English only for now. The keypad works in every language.
- A transfer goes only to a number you typed. In practice mode no call is placed.
- On an office phone connection, use an extension (like 202) for a department. Callers are handed to your phone system, which connects them. A full outside number works only if your phone system knows how to dial it. On Twilio, use a full phone number: an extension is skipped there and the caller hears a polite message.
- On an office phone connection a custom greeting is spoken with the computer's own voice (Mac and many Linux systems have one). If the computer has none, the agent plays the agent's recorded standard menu until you voice your greeting with Voice it in my agent's voice.
- Switch back any time: Use the standard menu restores the agent's menu. Your custom menu is saved separately, so an agent update never overwrites it.
- Stuck? Press Full Guide on the connection you are setting up, or see the other guides in Connect.
Bookings: let your AI book and confirm on the phone
Turn this on and your AI can book a table (or an appointment) and confirm it while the caller is still on the line, instead of only passing a request to your team.
- Open Your agent, find Bookings and press Set up bookings.
- Choose the days you take bookings, when seating opens and the last seating, how long a booking lasts, the largest party the AI may book, and your seating areas with how many seats each has (for example inside 40, outside 24).
- Press Save and switch on. The AI is now allowed to book (Settings, Built-in safeguards shows it as "Book and confirm tables or appointments").
What happens on a call: the guest asks their questions, then asks to book. The AI collects the name, how many people, the day and time and where they want to sit, one question at a time. The booking book checks the request against your rules, against the bookings already made, and against your calendar (an event whose title says "Closed", "Private party" or "Event" closes that time). If it fits, the AI says the real result: "You are booked: a table for four outside, tonight at 7 PM, under Daniel. Your confirmation code is 4 8 2 7." If it does not fit, the guest hears the nearest times that do. Your team is told in Slack or Teams for every booking, and you can cancel one from the same card.
Your calendar. Every booking is published as a calendar feed. Copy the address shown under Your bookings as a calendar and add it to Outlook, Google Calendar or Apple Calendar (Add calendar, From the internet); bookings then appear in your own calendar. Calendars refresh on their own schedule (Outlook can take a few hours), so the agent's booking book, not the calendar, decides what is free. If you connected a Google calendar the agent may write to, the booking is confirmed only after that calendar accepts it. In practice mode bookings are kept and marked "practice booking": nothing is published or written to a calendar.
Slow speech. The AI says things it has not said before by generating new speech. On a free account that can take several seconds, so callers hear short "one moment" lines meanwhile. Settings, Built-in safeguards has a limit for how long they wait before a person takes over (default about six seconds, up to 30). Paid accounts use a faster lane.
If something is wrong
- A test does nothing: the agent is in practice mode, which only shows what would happen. Press Go live when you are ready (Step 7).
- A step says it needs something connected: open Connect and connect it (the step names what, for example Twilio or Slack).
- The phone menu does not play: check your phone line is connected in Connect and the number points at the agent.
- Still stuck? In the agent press Connect, then Download report, and email it to support. It never contains keys or customer messages.
All help guides · Every agent feature · AI receptionist by industry
Questions
What if this happens: A test does nothing?
the agent is in practice mode, which only shows what would happen. Press Go live when you are ready (Step 7).
What if this happens: A step says it needs something connected?
open Connect and connect it (the step names what, for example Twilio or Slack).
What if this happens: The phone menu does not play?
check your phone line is connected in Connect and the number points at the agent.
What if this happens: Still stuck??
In the agent press Connect, then Download report, and email it to support. It never contains keys or customer messages.