Text from your own Android phone
A step-by-step guide with pictures, from the Speakvora agent's own Connect tab.
Short answer: Customers text your normal number. The agent answers from that same phone and SIM. Time: about 15 minutes. Cost: nothing beyond your normal phone plan.
Every key, number and name in the pictures is a made-up example. Nothing here asks you to share a real key with anyone but the app on your own computer.
Customers text your normal number. The agent answers from that same phone and SIM. Time: about 15 minutes. Cost: nothing beyond your normal phone plan.
Before you start
- An Android phone with the SIM and number customers already text. It must stay on, charged, with signal.
- This agent running, and a public web address for it (Settings, Your business details, Public address). Texts the phone receives are sent to that address. If you do not have one yet, see "Public address" at the end.
Step 1. Install the phone app
- On the phone open this page in the browser: github.com/capcom6/android-sms-gateway/releases . Scroll to the newest release and its Assets list.
- Tap the file that ends in
.apkto download it (if there are several, choose the one without "debug" in its name). Android may warn that this type of file can harm your device; the app is open source, so choose to download anyway. - Open the downloaded file. If Android says installing from the browser is blocked, tap Settings, switch on Allow from this source, go back, and tap Install.
- Open the app (it is called SMSGate). When it asks for permission to send and view SMS messages, and for notifications, tap Allow.
- Keep the app alive: Android Settings, Apps, SMSGate, Battery, choose Unrestricted. Otherwise Android may stop it in the background.
Step 2. Switch on the cloud server
- The app opens on the Home tab with two switches: Local server and Cloud server. Leave Local server off.
- Turn Cloud server on. The top bar should say "Internet connection: available".
- Under Cloud server you will now see four lines: Server address (api.sms-gate.app), Username, Password and Device ID. Tap a line to copy it. Keep Start on boot switched on.
- Never press Stop service unless you want the phone to stop answering texts.
Step 2b. Turn off RCS chat features on that phone (important)
Newer Android and iPhone messaging can send "RCS chats" instead of ordinary SMS. The SMSGate app only sees ordinary SMS, so RCS chats would be invisible to the agent.
- Open the Messages app on the business phone (Google Messages or Samsung Messages).
- Tap your profile picture or the three dots, then Messages settings (or Settings), then RCS chats (Samsung: Chat settings).
- Switch Turn on RCS chats off.
- Customers' texts then arrive as ordinary SMS and the agent answers them. This applies to the business phone only.
What each screen of the app looks like
Use these pictures to check you are in the right place. Account details are blurred out.
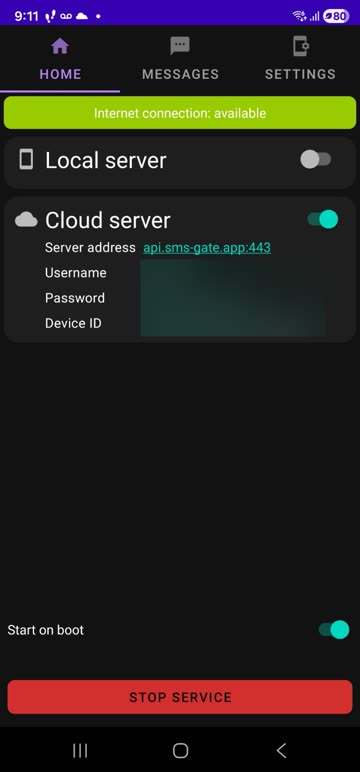
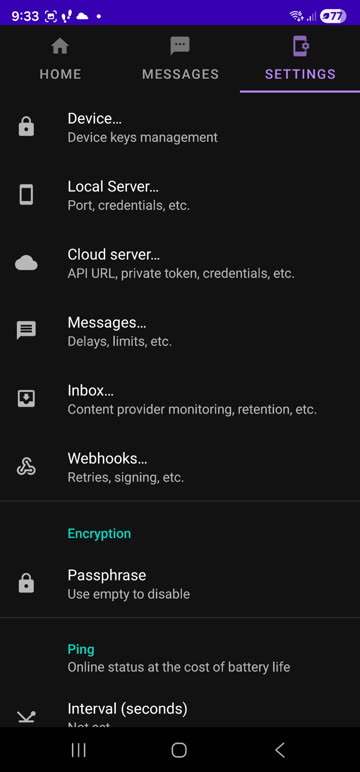
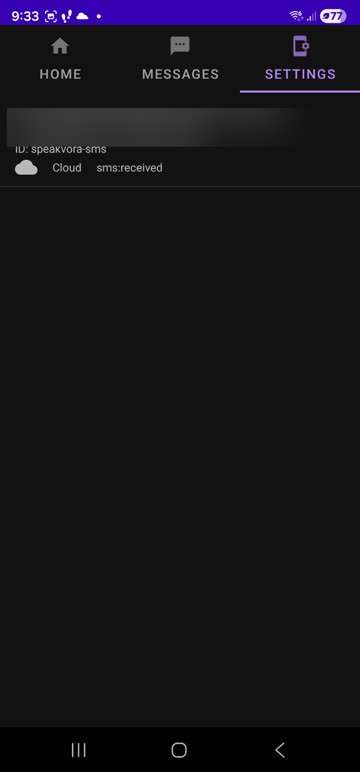
These are the screens you will pass through, so you know you are in the right place.
- Home tab: a green bar "Internet connection: available", then two cards. Local server (leave it off) and Cloud server (turn it on). The Cloud card lists Server address (api.sms-gate.app:443), Username, Password and Device ID. At the bottom: Start on boot (leave on) and a red Stop service button.
- Messages tab: every text the app has sent, with its state (Pending, Processed, Sent, Delivered or Failed).
- Settings tab: a list: Device (keys), Local Server, Cloud server, Messages (delays and limits), Inbox, Webhooks, Encryption passphrase (leave empty), Ping.
- Settings, Webhooks: Require Internet connection (leave on), Retry count (15 is fine), Signing Key, Registered Webhooks and Webhook Queue.
- Registered Webhooks should list one entry whose address ends in
/android/sms, marked Cloud andsms:received. If the list is empty, press Test in the agent again (it registers it for you). - Webhook Queue shows every delivery attempt to the agent with filters All and Failed. If something is Failed, the signing key or the agent's public address is wrong.
Tip: tap any value on the Home tab (username, password, device ID) to copy it, then paste it into the agent so no character is mistyped.
Step 3. Copy three things into the agent
- In the agent open Connect, then Your Android phone (texts).
- Type the Username and Password exactly as shown on the Home tab (tap each one in the app to copy it, then paste). Letters like l, I and 1, or O and 0, are easy to mix up when typing.
- In the app open Settings, Webhooks, Signing Key and set it to a plain key of letters and numbers only (for example
mybusinesskey2026). Avoid apostrophes and spaces: a phone keyboard can swap them for look-alike characters and every message will then be rejected. Type the same key into the agent. This is how the agent knows a message really came from your phone. - Press Save and test. It should say it is signed in and how many phones it sees.
Step 4. Check it works
- The agent registers its address with the phone app for you when the test passes. If it says it could not, check the public address.
- From a different phone text your number: "what are your hours". The agent should answer from your phone within a few seconds.
- In the agent, Calls and texts shows the conversation.
Using more than one phone (front desk, billing, returns)
- Install the app on each phone and sign each in to the same cloud account, or give each phone its own account.
- In the app on each phone find its Device ID.
- In the agent, under "Your phones / lines", type:
Front desk=DEVICE-ID, Billing=DEVICE-ID. - A customer's reply always leaves from the phone they texted. In a workflow text step you can pick the line.
Good to know
- Your plan and your carrier's rules apply. Normal customer-service volume is fine; do not send bulk marketing from a personal SIM.
- Texts can be picked up only while the phone is on and online. If the phone is off, customers get no answer until it is back; messages wait with your carrier or are lost, depending on the carrier.
- Replies to STOP are honoured automatically.
- To keep messages off the app's cloud relay, run the app in local mode and put the phone's address under "Phone address" (needs the agent and phone on the same network, and a secure address).
Public address (if you do not have one)
The agent needs one web address the internet can reach. The easiest free way is a Cloudflare named tunnel (cloudflared) or ngrok free domain pointing at port 8787 of the agent's computer. Paste the https address into Settings, Your business details, Public address. See docs/setup-services.md.
If something is wrong
- Texts reach the phone but the agent never answers: in the app, Settings, Webhooks, Webhook Queue shows each attempt. "Failed" usually means the signing key differs. The agent's Activity log lists rejected messages.
- Texts do not arrive at the agent but show up in the Messages app: RCS is probably still on (Step 2b). Switch it off, then text again.
- After you connect, wait a minute: the phone app takes a short time to pick up the new webhook from the cloud. In the app, Settings, Registered Webhooks should list one.
- Test says 401: re-copy username and password exactly.
- Test says no phones: open the app, make sure Cloud server says Online.
- Texts arrive but no answer: check the signing key matches the app, and that the public address is the one the test reported.
All help guides · Every agent feature · AI receptionist by industry
Questions
What is this guide for?
Customers text your normal number. The agent answers from that same phone and SIM. Time: about 15 minutes. Cost: nothing beyond your normal phone plan.